> ## Documentation Index
> Fetch the complete documentation index at: https://docs.premierecopilot.com/llms.txt
> Use this file to discover all available pages before exploring further.
# Jump Cut Tool
> Automatically remove silence from your footage.
Jump Cut removes silence from your footage automatically. It uses **voice detection** — not a simple volume threshold — so it keeps whispers, breaths at the end of a sentence and quiet delivery, while cutting real dead air. It is approximately **10x faster** than competitors like AutoPod.
Works in **Premiere Pro** and **DaVinci Resolve**.
## Quick Start
The panel is organised in three numbered steps: **Settings → Preview → Apply to timeline**.
Open the **Tools Menu** (bottom left) and select **Jump Cut**.
Put the playhead over a representative part of your sequence — one containing both speech and silence.
Click **Preview**. A 15-second sample is analysed and drawn as a waveform: everything shaded **red** will be removed.
Move the sliders and watch the red zones update **instantly** — no re-analysis needed. Press play to listen to the sample.
Click **Create Jump Cuts**. Your sequence is backed up automatically before anything is cut.
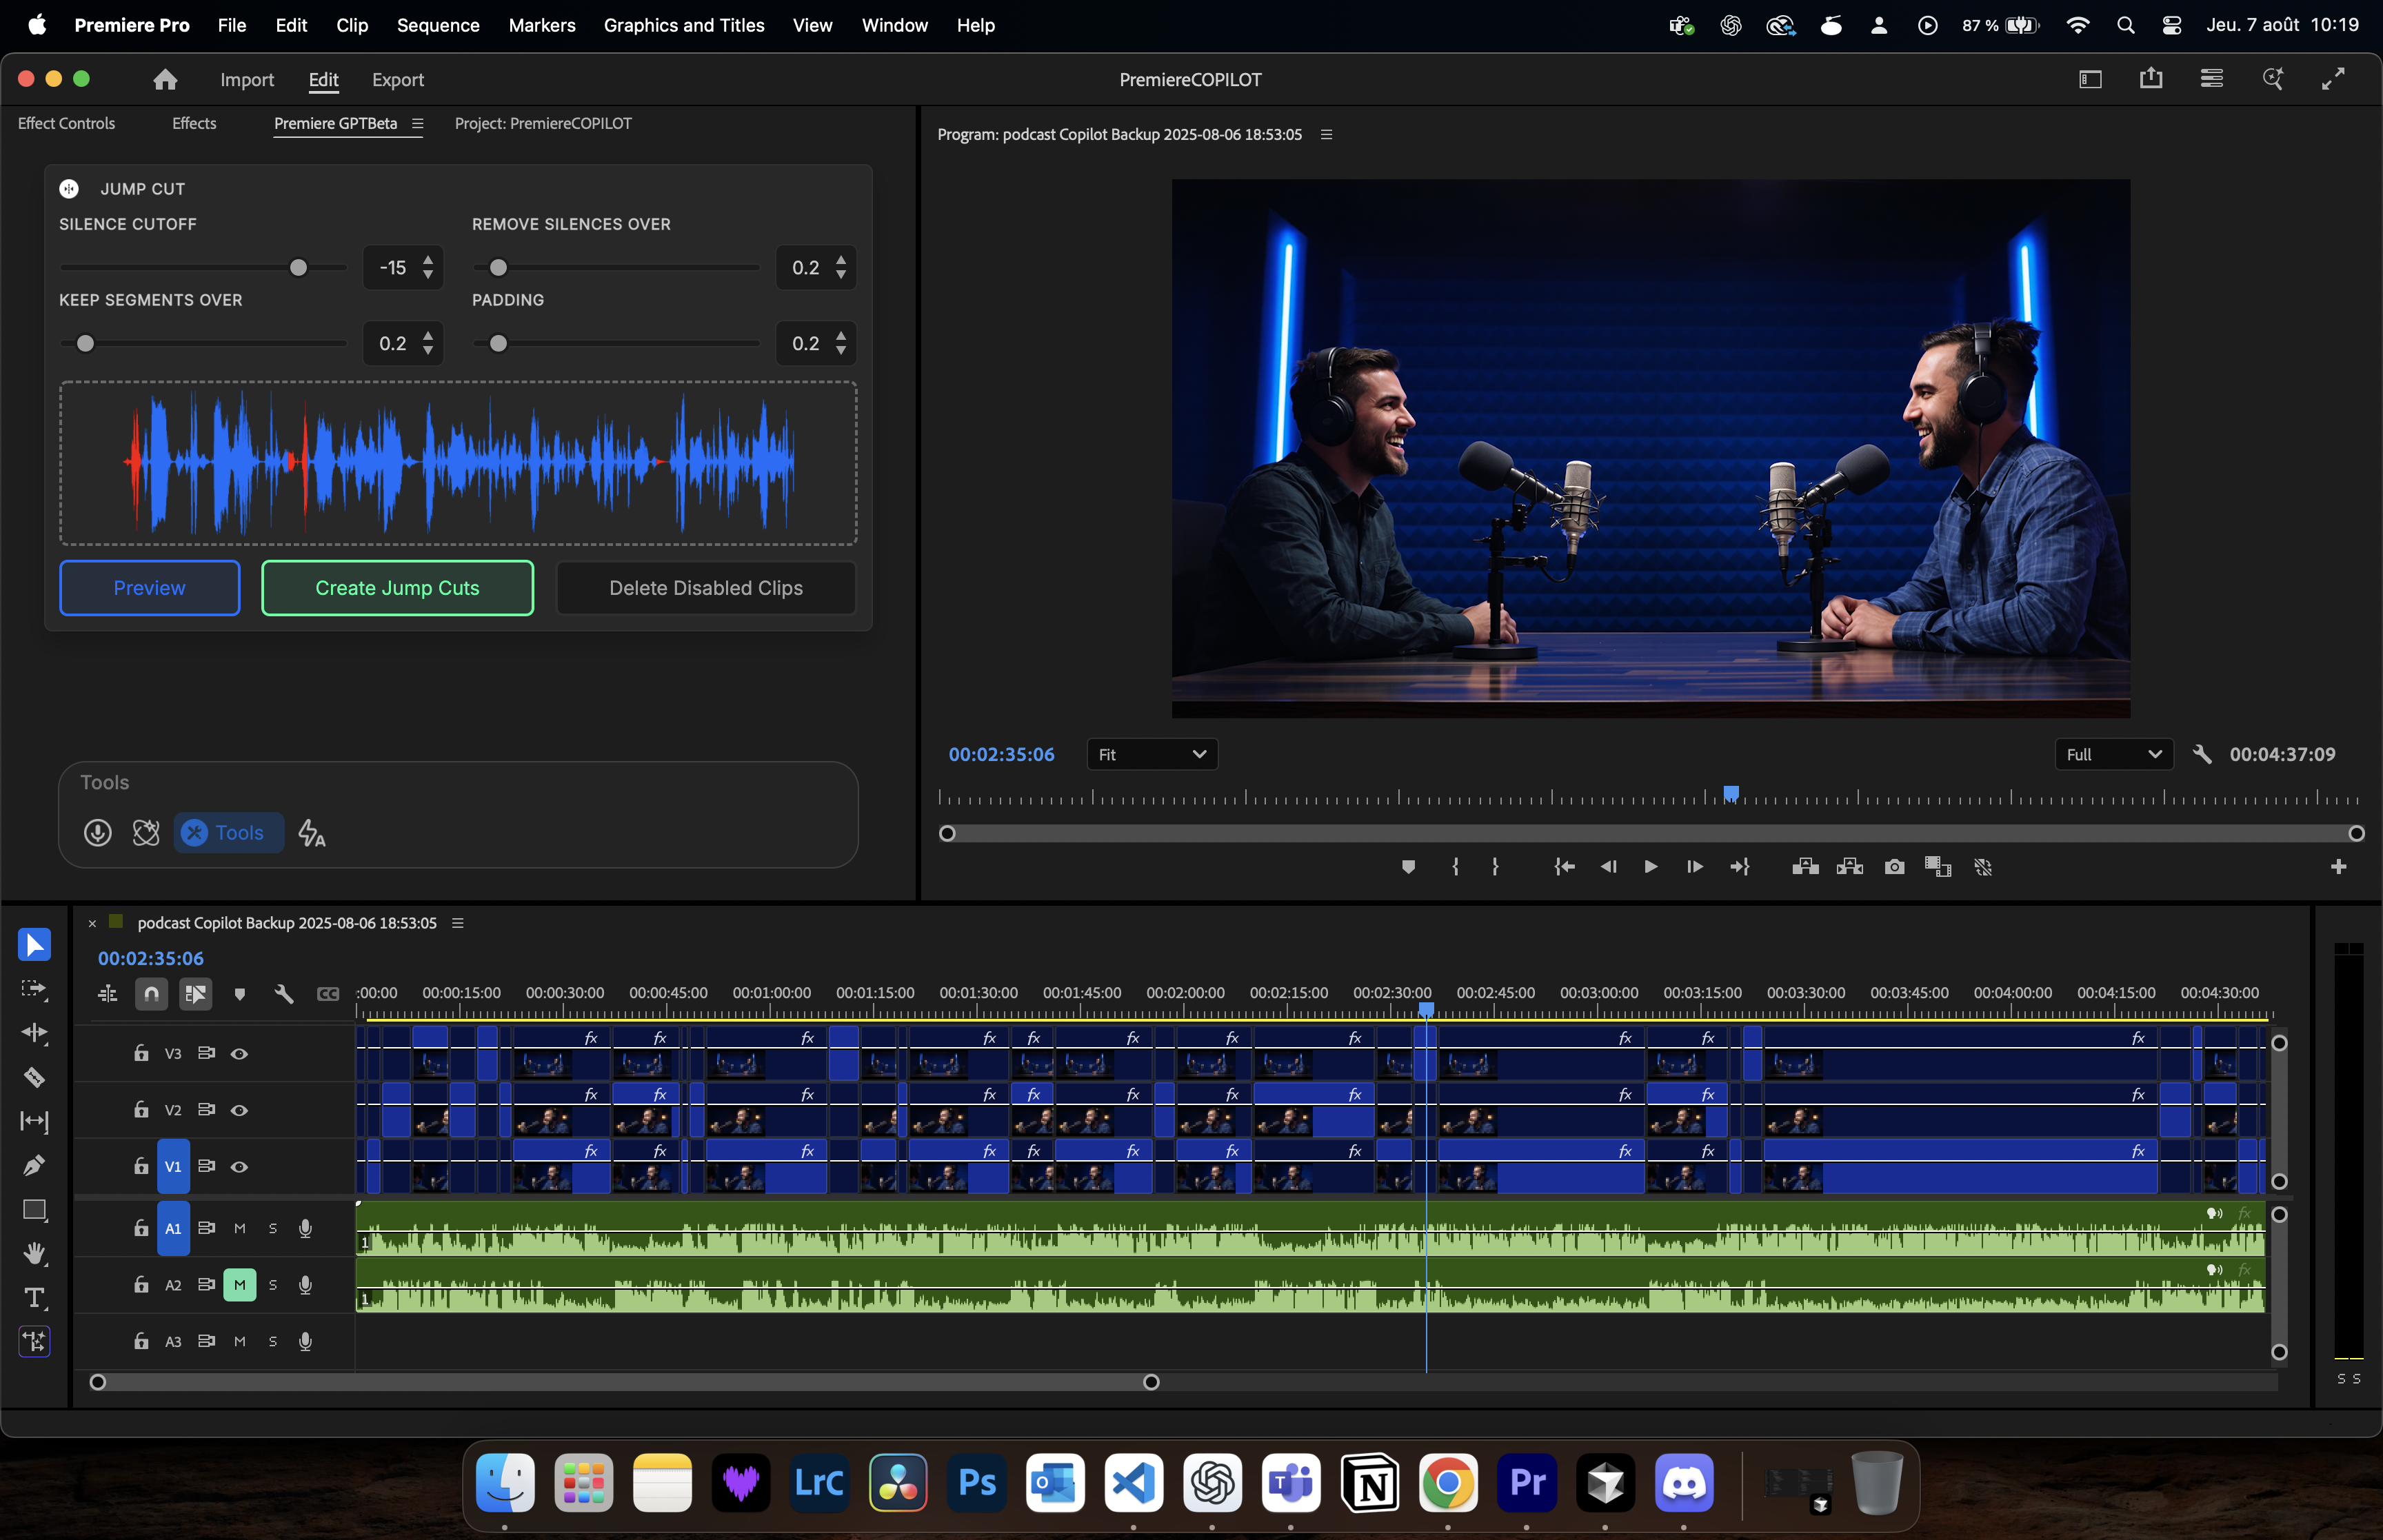 ## Step 1 — Settings
| Setting | Range | Default | What it does |
| ------------------------ | ----------- | ---------- | ----------------------------------------------------------------------- |
| **Voice Sensitivity** | 0.10 – 0.90 | **0.50** | How confident the detector must be that it hears a voice. |
| **Remove Silences Over** | 0 – 2 s | **0.20 s** | Silences shorter than this are left alone. |
| **Keep Segments Over** | 0 – 2 s | **0.20 s** | Speech chunks shorter than this are treated as noise and removed. |
| **Padding** | -1 – 2 s | **0.10 s** | Margin added before and after every kept segment. |
| **Split L/R Padding** | toggle | off | Splits Padding into independent **Padding Left** and **Padding Right**. |
**Voice Sensitivity replaces the old "Silence Cutoff" (dB) setting.** It is no longer a volume threshold: the tool detects *voice*, so background noise, room tone or music no longer count as "not silent". Higher value = stricter = cuts more.
### Voice Sensitivity
* **0.10 – 0.30** — very permissive. Keeps whispers, soft-spoken delivery, ASMR, quiet interviews. Use when the tool is eating the beginning of your words.
* **0.40 – 0.60** — balanced. Standard talking-head, podcast, tutorial. **Start here.**
* **0.70 – 0.90** — strict. Cuts aggressively; useful in noisy rooms, with air conditioning, street noise or a loud music bed where the detector is too generous.
If the cut sounds *clipped* — the first syllable is missing — lower the sensitivity before touching padding. If it sounds *sloppy*, with breaths and hesitations surviving, raise it.
### Remove Silences Over
The minimum length a silence must reach before it's worth cutting.
* **0.10 – 0.20 s** — very tight, machine-gun pacing. Great for social/vertical edits.
* **0.30 – 0.60 s** — natural rhythm. Removes the dead air but keeps the breathing room of speech.
* **1 s and above** — only removes the long pauses. Good for interviews where the silences carry meaning.
### Keep Segments Over
Anything shorter than this is not considered real speech: a lip smack, a click, a door, a cough between two sentences. Raise it if isolated noises are kept as tiny orphan clips; keep it low if you have short interjections ("yes", "no", "hm") that must survive.
### Padding
Padding gives each kept segment a bit of air, so cuts don't feel surgical.
* **Positive values (0.05 – 0.30 s)** — the usual case. Extends each segment on both sides.
* **0** — hard, immediate cuts. Maximum tightness, harsher listening.
* **Negative values (down to -1 s)** — shrinks the kept segments, cutting *into* the speech. Only for very aggressive stylistic edits — it will clip words.
Turn on **Split L/R Padding** to get the most natural result: a **small left padding** (0.05 s, so the attack of the word isn't chopped) and a **larger right padding** (0.15–0.25 s, so the end of the sentence can breathe).
### Presets
The preset bar at the top of Step 1 saves your whole slider configuration under a name and reloads it in one click. Build one per format — *Podcast*, *Reels*, *Interview* — instead of re-tuning every session.
## Step 2 — Preview
The preview analyses a **15-second sample** taken at the playhead and is **free** — it doesn't consume credits, so you can run it as often as you like.
Blue = kept. **Red overlay = removed.** The picture reflects your current sliders in real time.
Hit the green play button, or click anywhere on the waveform to jump there and audition the passage.
Moving a slider after a preview **does not** require a new analysis — the cuts are recomputed locally and instantly. Only click **Preview** again if you move the playhead to a different part of the sequence.
Preview the hardest part of your footage, not the easiest: the passage where you hesitate, where the room is noisy, or where you speak softly. Settings that survive there will work everywhere.
## Step 3 — Apply to timeline
Analyses the **whole sequence** and applies the cuts. A **backup of your sequence is created automatically** beforehand, so you can always go back.
Jump Cut disables the silent clips instead of deleting them, so you can review the result. Click **Delete Disabled Clips** to remove them and close the gaps.
Tick the checkbox on that same button to **auto-delete** at the end of every run.
**On DaVinci Resolve**, the *Delete Disabled Clips* control is hidden — and that's expected. Resolve rebuilds a new timeline containing only the kept segments, so there is nothing left to delete.
## From the Copilot
You can also just ask in the chat:
> *"Remove the silences from my sequence."*
The Copilot runs the same engine with sensible defaults. Use the panel when you want to see the waveform and dial the pacing in yourself.
## Common Pitfalls
* **Playhead over a silent or music-only area** → the preview sample contains no speech and looks entirely red. Move it over real dialogue.
* **Words getting clipped** → lower **Voice Sensitivity**, then raise **Padding Left**. In that order.
* **Breaths and hesitations surviving** → raise **Voice Sensitivity** and lower **Remove Silences Over**.
* **Tiny orphan clips left over** → raise **Keep Segments Over**.
* **Loud music bed under the voice** → voice detection struggles. Mute or lower the music track before running, or push the sensitivity up.
* **Negative padding** eats into speech by design — it is not a "tighter" setting, it's a destructive one.
**Recommended starting point** for a talking-head edit: Voice Sensitivity **0.5**, Remove Silences Over **0.3 s**, Keep Segments Over **0.2 s**, Split L/R Padding **on** with **0.05 s** left and **0.20 s** right.
## Step 1 — Settings
| Setting | Range | Default | What it does |
| ------------------------ | ----------- | ---------- | ----------------------------------------------------------------------- |
| **Voice Sensitivity** | 0.10 – 0.90 | **0.50** | How confident the detector must be that it hears a voice. |
| **Remove Silences Over** | 0 – 2 s | **0.20 s** | Silences shorter than this are left alone. |
| **Keep Segments Over** | 0 – 2 s | **0.20 s** | Speech chunks shorter than this are treated as noise and removed. |
| **Padding** | -1 – 2 s | **0.10 s** | Margin added before and after every kept segment. |
| **Split L/R Padding** | toggle | off | Splits Padding into independent **Padding Left** and **Padding Right**. |
**Voice Sensitivity replaces the old "Silence Cutoff" (dB) setting.** It is no longer a volume threshold: the tool detects *voice*, so background noise, room tone or music no longer count as "not silent". Higher value = stricter = cuts more.
### Voice Sensitivity
* **0.10 – 0.30** — very permissive. Keeps whispers, soft-spoken delivery, ASMR, quiet interviews. Use when the tool is eating the beginning of your words.
* **0.40 – 0.60** — balanced. Standard talking-head, podcast, tutorial. **Start here.**
* **0.70 – 0.90** — strict. Cuts aggressively; useful in noisy rooms, with air conditioning, street noise or a loud music bed where the detector is too generous.
If the cut sounds *clipped* — the first syllable is missing — lower the sensitivity before touching padding. If it sounds *sloppy*, with breaths and hesitations surviving, raise it.
### Remove Silences Over
The minimum length a silence must reach before it's worth cutting.
* **0.10 – 0.20 s** — very tight, machine-gun pacing. Great for social/vertical edits.
* **0.30 – 0.60 s** — natural rhythm. Removes the dead air but keeps the breathing room of speech.
* **1 s and above** — only removes the long pauses. Good for interviews where the silences carry meaning.
### Keep Segments Over
Anything shorter than this is not considered real speech: a lip smack, a click, a door, a cough between two sentences. Raise it if isolated noises are kept as tiny orphan clips; keep it low if you have short interjections ("yes", "no", "hm") that must survive.
### Padding
Padding gives each kept segment a bit of air, so cuts don't feel surgical.
* **Positive values (0.05 – 0.30 s)** — the usual case. Extends each segment on both sides.
* **0** — hard, immediate cuts. Maximum tightness, harsher listening.
* **Negative values (down to -1 s)** — shrinks the kept segments, cutting *into* the speech. Only for very aggressive stylistic edits — it will clip words.
Turn on **Split L/R Padding** to get the most natural result: a **small left padding** (0.05 s, so the attack of the word isn't chopped) and a **larger right padding** (0.15–0.25 s, so the end of the sentence can breathe).
### Presets
The preset bar at the top of Step 1 saves your whole slider configuration under a name and reloads it in one click. Build one per format — *Podcast*, *Reels*, *Interview* — instead of re-tuning every session.
## Step 2 — Preview
The preview analyses a **15-second sample** taken at the playhead and is **free** — it doesn't consume credits, so you can run it as often as you like.
Blue = kept. **Red overlay = removed.** The picture reflects your current sliders in real time.
Hit the green play button, or click anywhere on the waveform to jump there and audition the passage.
Moving a slider after a preview **does not** require a new analysis — the cuts are recomputed locally and instantly. Only click **Preview** again if you move the playhead to a different part of the sequence.
Preview the hardest part of your footage, not the easiest: the passage where you hesitate, where the room is noisy, or where you speak softly. Settings that survive there will work everywhere.
## Step 3 — Apply to timeline
Analyses the **whole sequence** and applies the cuts. A **backup of your sequence is created automatically** beforehand, so you can always go back.
Jump Cut disables the silent clips instead of deleting them, so you can review the result. Click **Delete Disabled Clips** to remove them and close the gaps.
Tick the checkbox on that same button to **auto-delete** at the end of every run.
**On DaVinci Resolve**, the *Delete Disabled Clips* control is hidden — and that's expected. Resolve rebuilds a new timeline containing only the kept segments, so there is nothing left to delete.
## From the Copilot
You can also just ask in the chat:
> *"Remove the silences from my sequence."*
The Copilot runs the same engine with sensible defaults. Use the panel when you want to see the waveform and dial the pacing in yourself.
## Common Pitfalls
* **Playhead over a silent or music-only area** → the preview sample contains no speech and looks entirely red. Move it over real dialogue.
* **Words getting clipped** → lower **Voice Sensitivity**, then raise **Padding Left**. In that order.
* **Breaths and hesitations surviving** → raise **Voice Sensitivity** and lower **Remove Silences Over**.
* **Tiny orphan clips left over** → raise **Keep Segments Over**.
* **Loud music bed under the voice** → voice detection struggles. Mute or lower the music track before running, or push the sensitivity up.
* **Negative padding** eats into speech by design — it is not a "tighter" setting, it's a destructive one.
**Recommended starting point** for a talking-head edit: Voice Sensitivity **0.5**, Remove Silences Over **0.3 s**, Keep Segments Over **0.2 s**, Split L/R Padding **on** with **0.05 s** left and **0.20 s** right.